Summary
This post corresponds to the verbatim (non-modified) report I used to apply to Binary Gecko’s Academy. Binary Gecko is a leading company in Vulnerability Research located in Germany that opened an academy program this year in Argentina with the noble goal of teaching the fundamentals of VR and preparing the next generation of Vulnerability Researchers in the region. This challenge had a duration of 7 days (ending on November 1st), and it consisted of 7 levels with increasing difficulty in RE on Windows x86_64. The end goal was to select the best alumni for the limited spots.
In case you’re wondering: yes, I managed to get into the Gecko Academy (\o/)
What I liked most about these challenges is that even though some levels were easy at first glance, some of them had special cases (inputs) where things could go very different from what was originally expected. You’ll see what I mean about this later.
Enough talk, let’s get to the disassembly!
Binary Gecko Academy Challenge
Basic Analysis
Starting with the basics for this binary, we can see from its magic bytes that it’s a PE for x86_64 without GUI (Console).

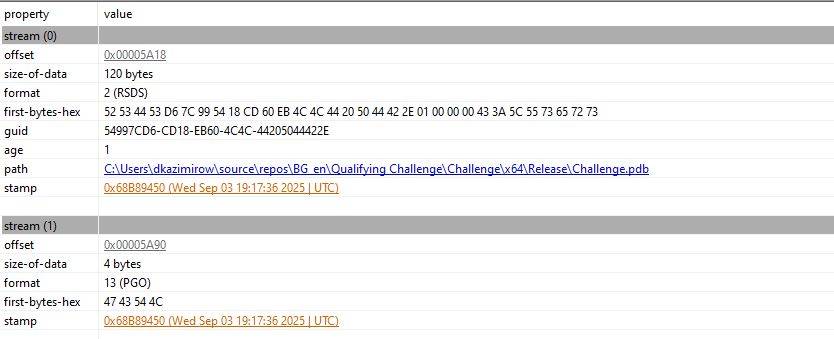
Parsing the PE headers, one can see that this program was compiled this year (on September), along with the path where it was compiled in (through the .pdb path). Hi dkazimirow!
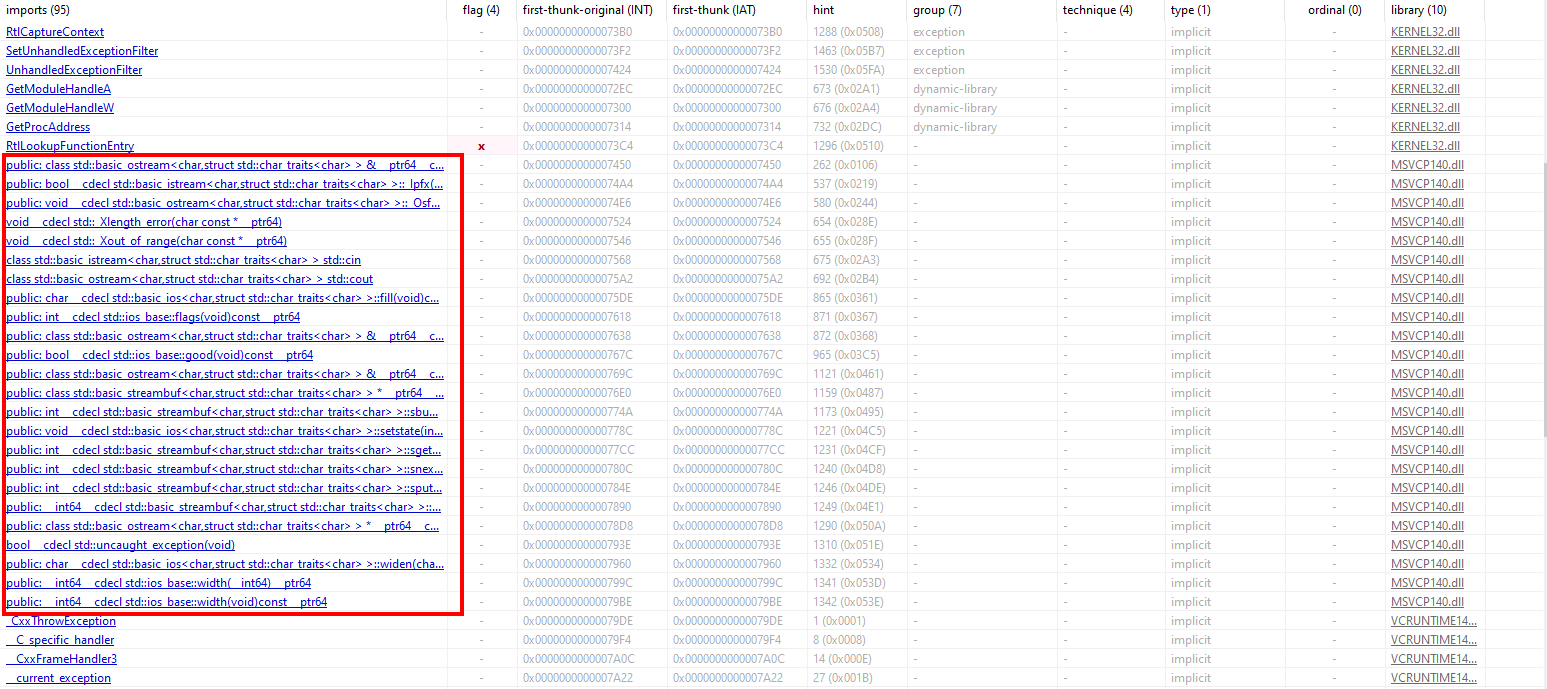
From the imports for this program, we quickly see that it’s a C++ binary. Although we can’t find the ID of its Visual Studio version used to compile it with.

Looking at the code sections, one that initially standed out was the section .retplne, as its flags show it’s only for read, but not execute nor write.

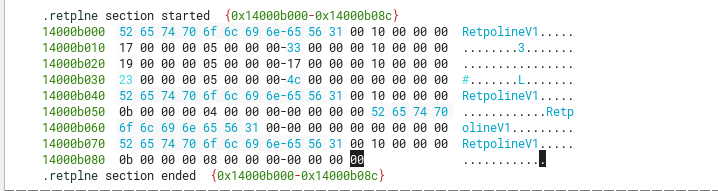
Looking it up on the internet, we quickly see it’s a code mitigation for branch speculation (Spectre family of attacks), so it’s not related to the challenge itself. So let’s go on with the rest of the analysis.
Life Simplifications
MSVC Function Signatures and Data Structures
Starting the analysis for the code, I have to note that I already had created and loaded some signature files for the MVSC compiler in different versions, along with the data structures for the Microsoft STL. This helps a lot when doing RE for Windows C++, as Microsoft’s CXX classes and functions differ a little from those of Linux when compiled with MSVC.
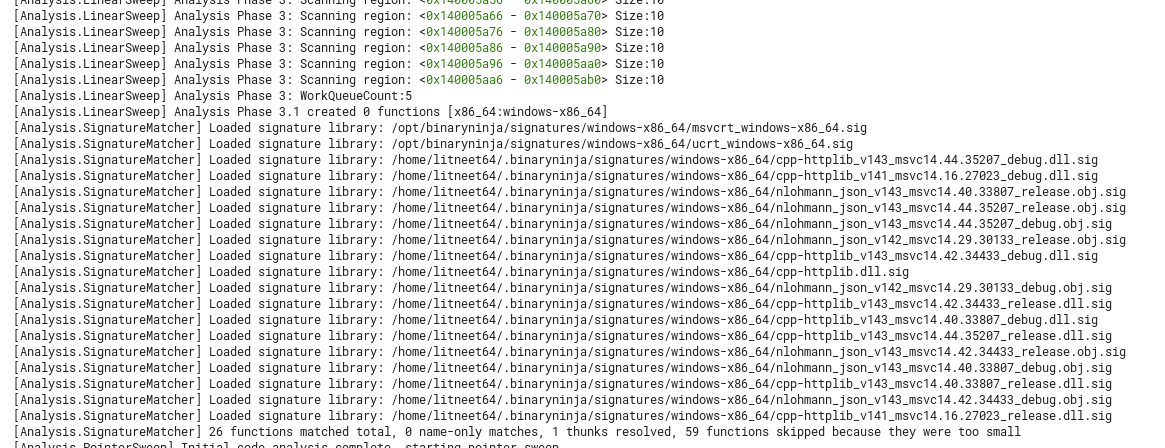
Still, by the end of this write-up I can already tell that there was little success with the function signatures I had, and had to manually identify most standard C++ functions from this binary. Although class definitions were (and always are) really useful.
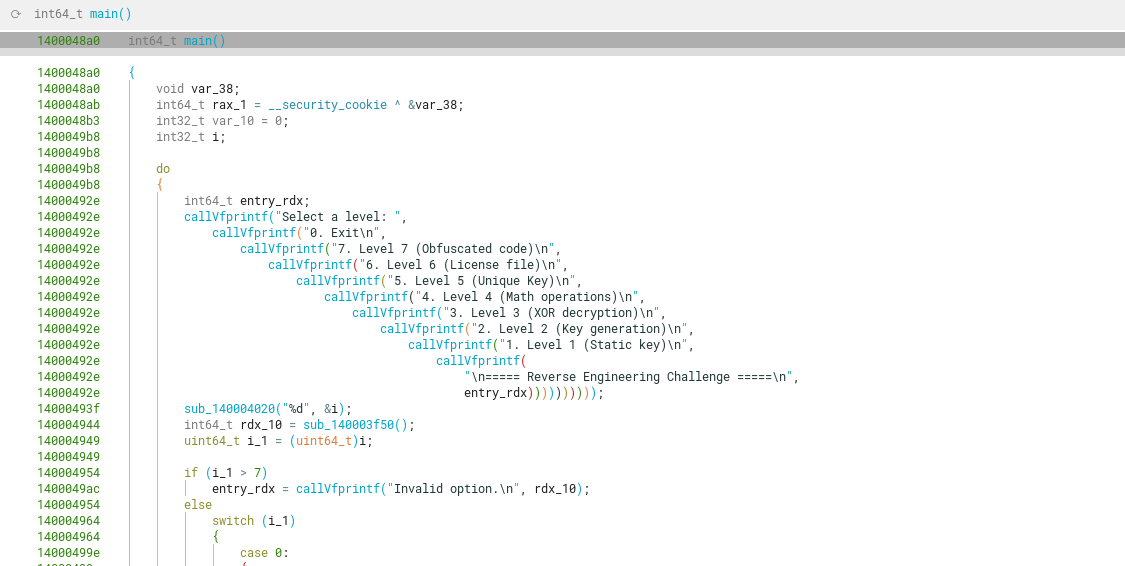
Main looks like this at the start, but we can start identifying commonly used functions (in the binary) and standard functions (like vfprintf, as shown below)
We can import standard classes from the actual Microsoft’s libraries.

For instance, standard classes like a vector<char> or basic_string<char> are defined here, with its corresponding offsets.
We can start renaming functions for levels in order to better understand cross-references between functions and deduce some call types from other levels.
Using Ariadne plugin for visual Callgraph
I usually analyze binaries with this plugin in order to visualize a clean callgraph between functions, in order to understand in a high level view how different functions are related to each other.
I like this plugin (https://github.com/seeinglogic/ariadne) because it shows you at most 3 levels of separation between calls, so even if a big program has lots of calls, one can only focus on the current function one sees in BinaryNinja.
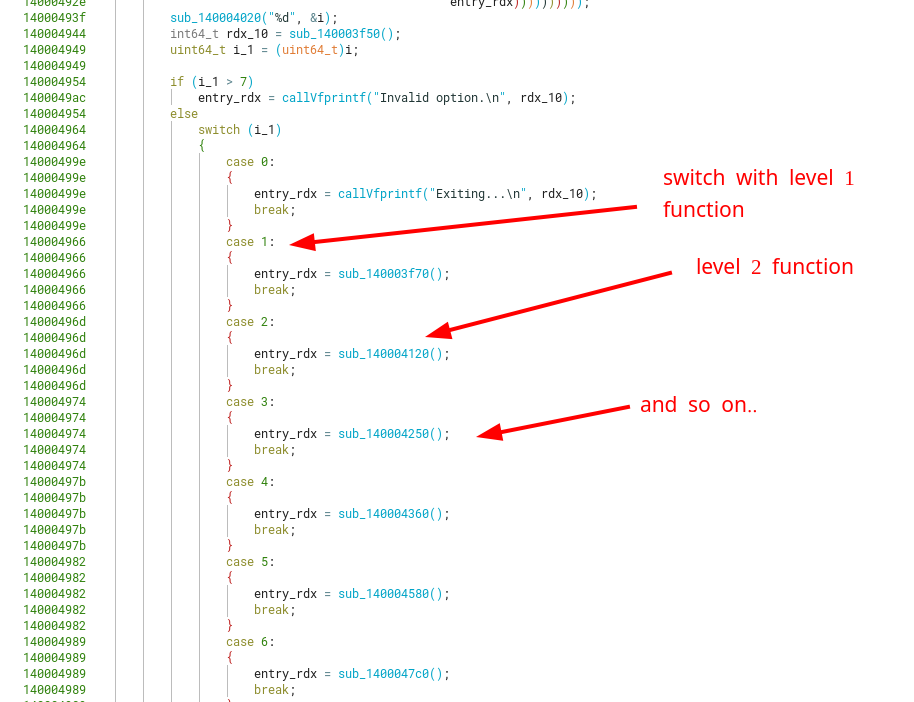
In this case, I’m seeing the calls made from Main
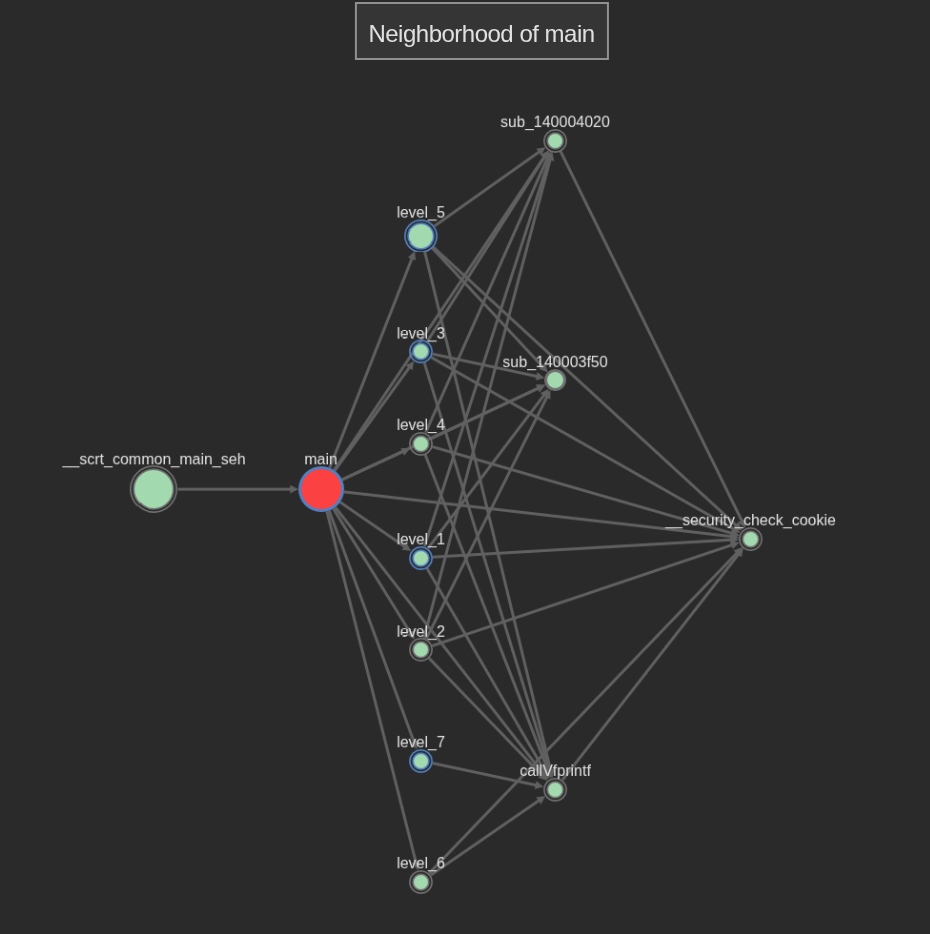
One can already see that many levels call sub_140003f50, so it’s a commonly used utility
Looking at the disassembled view of it, we can confirm the previous hypothesis. It’s a “getChar” kind of function that keeps accepting input until reaching a newline, returning it back as uint32_t instead of a char
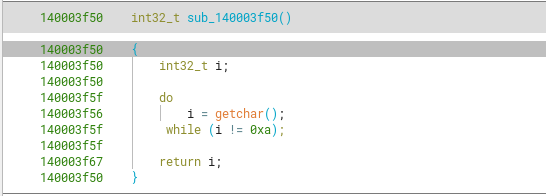
We can rename it to readUntilNewline.
At the end of this write-up, I can already note that this plugin was only useful for level_7, as it’s the only function that possessed a complex callgraph compared to the other levels.
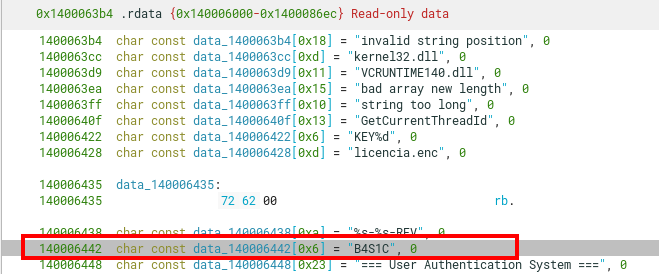
Level 1
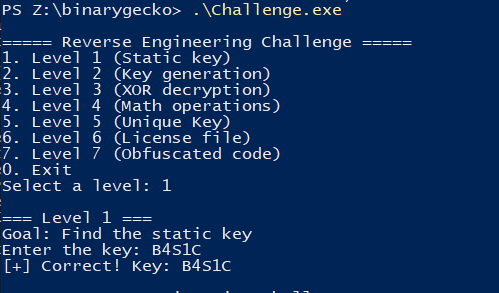
Starting with a simple view of the level 1 function, we can see that this level contains a hardcoded password (B4S1C) that is checked against our 19-byte string input.
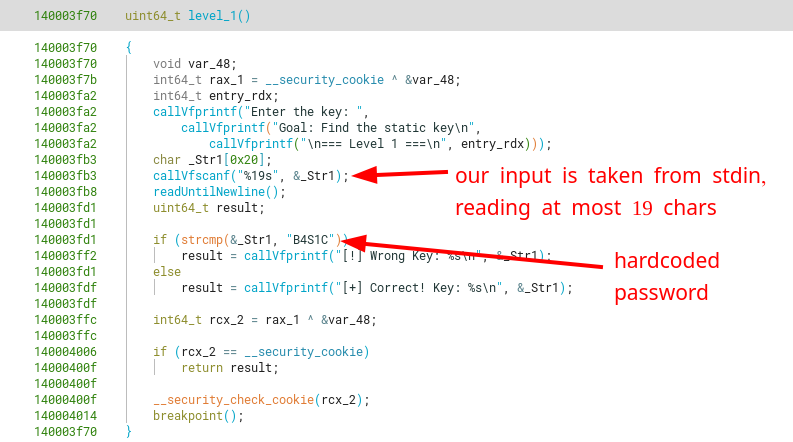
The string is stored at the .rdata section, along with other hardcoded strings.
The match needs to be exact, as the strcmp function checks the both strings byte-per-byte until finding the null-byte ending the string. So there’s no room for anything interesting.
We can easily confirm the match for the hardcoded key B4S1C on runtime.
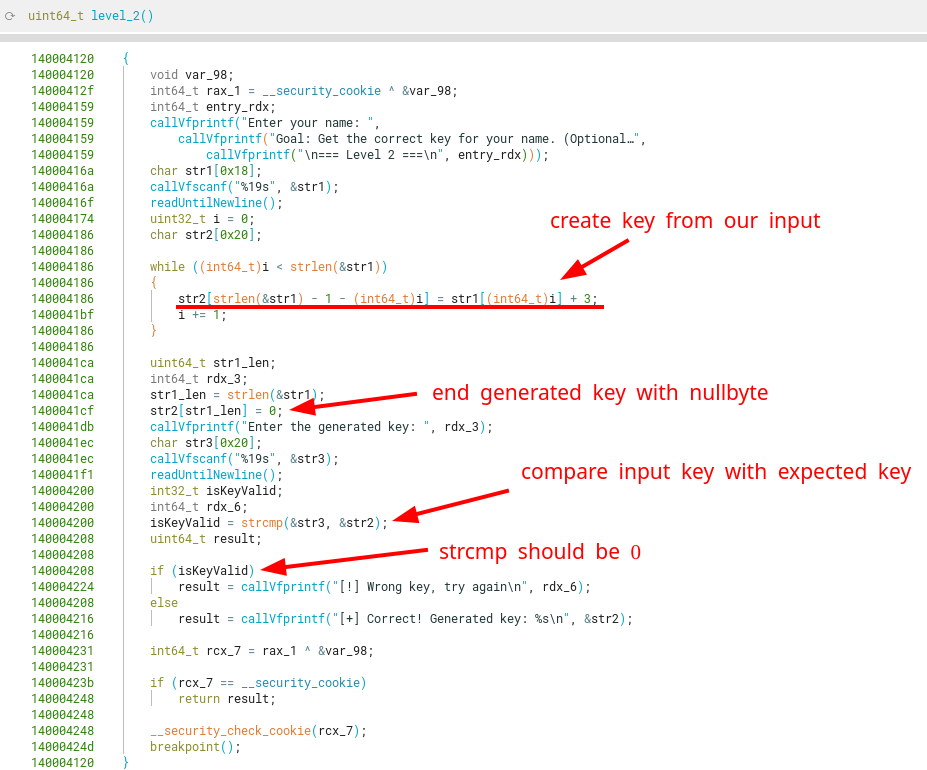
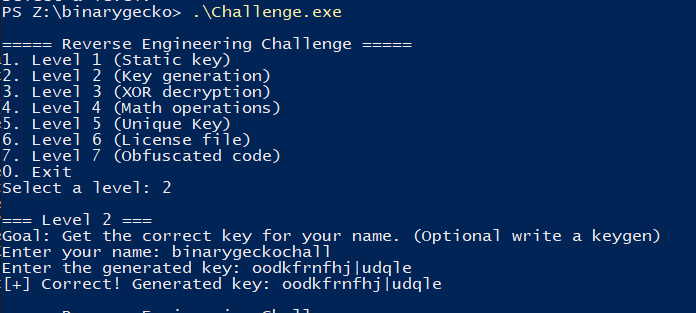
Level 2
First look
Having a quick look over the function level_2, shows us that our first input (19-byte long) is transformed using an affine cipher with each char, and stored in a reversed order inside a new string (the key). Then, another of our inputs (19-byte long again) is compared with the expected key, using memcmp. This means it should be the exact same c-string char by char, and return 0 on a match.
The string is read using the format string %19s in scanf, which means it will read 19 single-byte chars unless it finds a space, tab or newline (according to Microsoft’s specs).
The reference for the official docs for how scanf behaves can be found in:
- https://learn.microsoft.com/en-us/cpp/c-runtime-library/scanf-type-field-characters
- https://learn.microsoft.com/en-us/cpp/c-runtime-library/scanf-width-specification
Respectively.


Border cases
An interesting case comes up when we go near the top end of the border in the printable character range (0x20-0x7e). That is, using a string with chars like |, } and ~.
As the key generation function adds 3 to each byte in the input string, these chars will make the generated key go to non-printable chars.

Keygen
We can easily create a small Python script that generates the corresponding key for each input that you can give (shorter than 20 bytes).
|
|
Putting it to test!

It can even create solutions for border-cases.

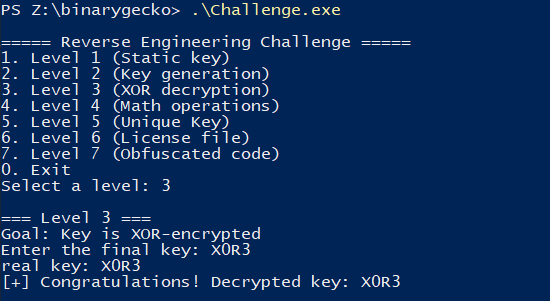
Level 3
First look
This level consists of decrypting a 4-byte hardcoded key using a XOR operation, along with a 1-byte XOR key (0x7a). The program first asks us for the expected key, which has to be at most 4-bytes long. Then it decrypts the hardcoded key with a XOR operation, and compares it with what we originally gave it. They should be the exact same input.
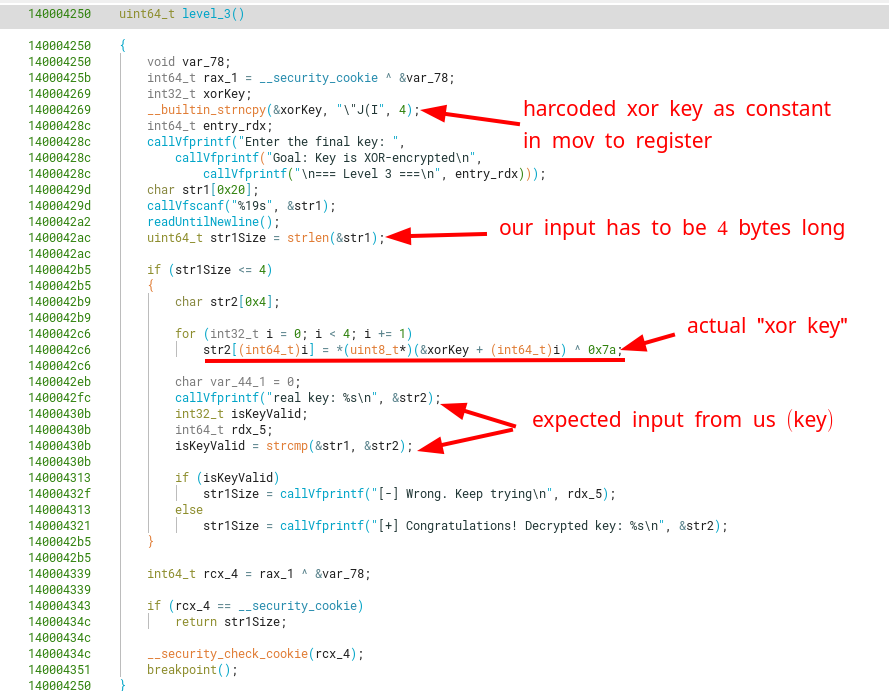
Another worthy of mention bit of info is that the xor’ed key was stored in the .data section, which means it was an initialized static variable.

![]()
Keygen
Creating a small script in Python gives us the decrypted key X0R3, which we can then test with the program.
|
|
![]()
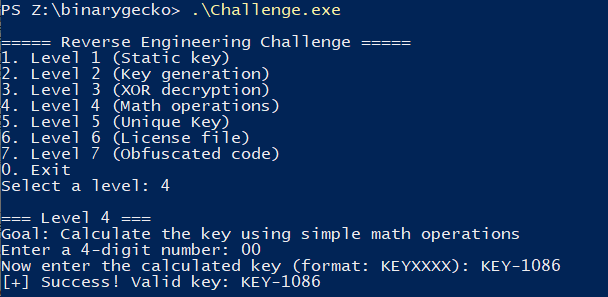
Level 4
First look
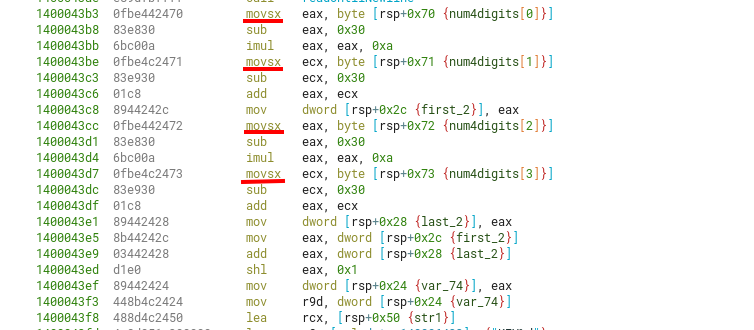
This level consists of choosing at most 4 digits as input to the program, and then try to predict how will the key be generated. From looking at the program in the decompiled view, we can clearly see the operations being made on them.
One operation transforms the ASCII representation of a number into its decimal counterpart, which is done when substracting 0x30 from the given char (e.g the ASCII char "9" is represented as byte 0x39, but substracting 0x30 gives back 0x09).
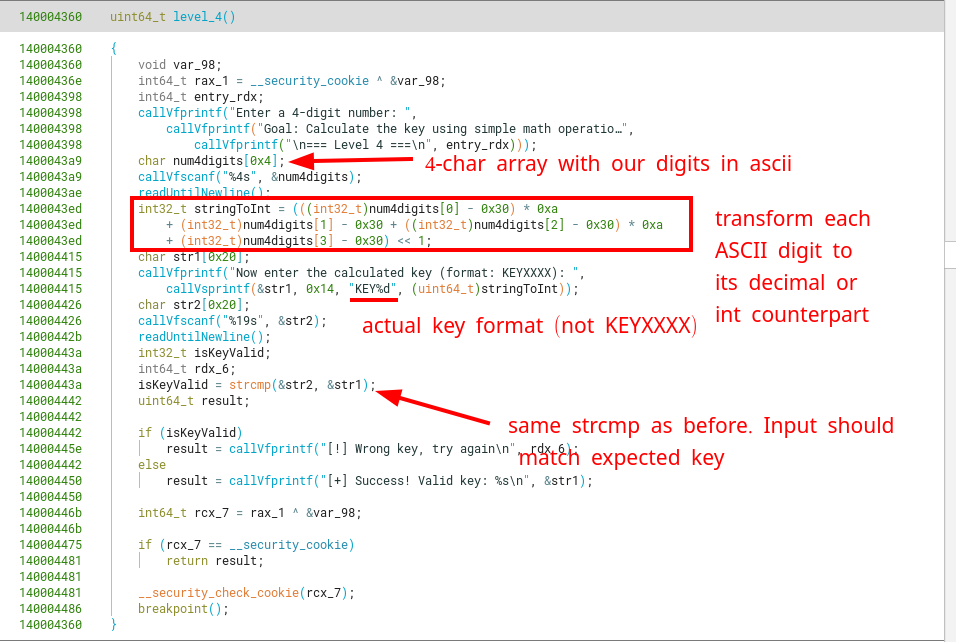
After doing a sort of asciiToIntfor each digit (sub eax, 0x30), only digits 1 and 3 are multiplied by 10 (0x0a) before adding them into the sum.
After we have the sum of the 4 transformed digits, we have to make a shift-left (SHL) operation with 1 bit (<< 1) to this sum.
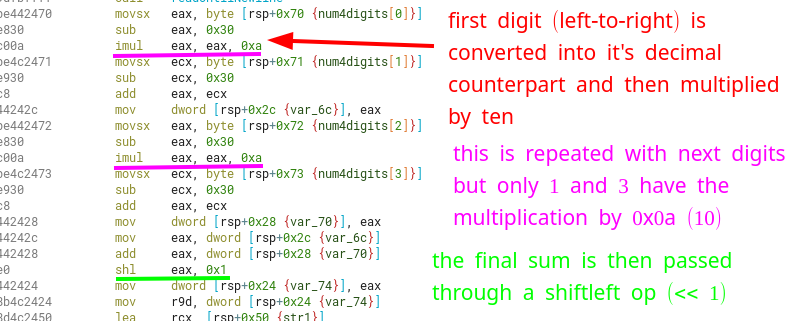
Note that these operations are performed on 32-bit signed integers (as EAX and ECX are used), so we could actually have negative numbers as the final generated key.
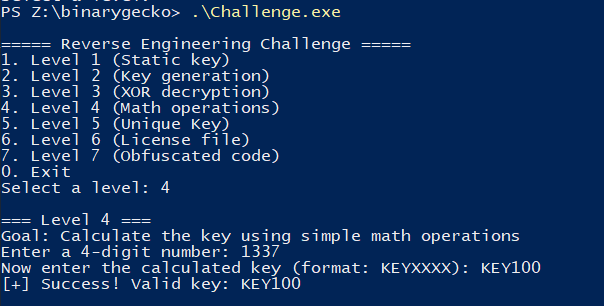
Manually solving a simple case
First we’ll solve this manually for the case of the input 1337, which should give KEY100.
|
|
Border Cases
Non-numeric chars
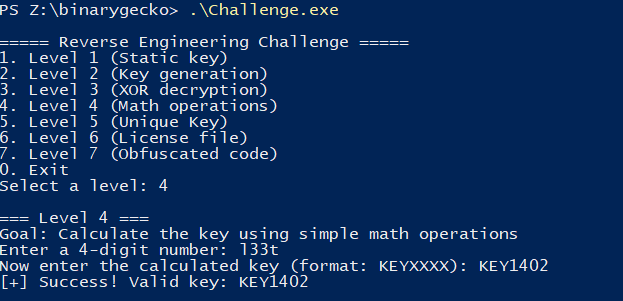
As the method for parsing the input is using the format string %4s, any 4-char sequence can be inputted and the same math operations will be performed on them. We can try our keygen with the input l33t, giving us the expected key KEY1402.

Less than 4 chars, signed Ints and underflow
One case I didn’t talk about is what happens when we input a char sequence of less than 4 chars, as the program expects. We can see that before reading the 4 printable ASCII chars (%4s), the address that will hold these chars (0x288351FCA0, in the program’s stack) is filled with an address (in little-endian) that doesn’t change between runs.

This address points somewhere in the .data section from the loaded dll ucrtbase.dll.

After storing the chars read, this vestigial data will be overwritten with the chars and an extra null-byte (as all strings end). In this case, we inputted the char “a” and we can see it overwrote the 1st and 2nd bytes.
![]()
These 4 bytes will be used to perform the next “math operations”.
Another thing to notice, is that each char in the 4-byte sequence of our input will be sign-extended (through movsx) to a 32-bit signed integer.
This means chars that have it’s most significant bit (MSB) set will become huge numbers (if represented as unsigned integers) afterwards. This can of course bias the key generation.
In this case, the original input was “02”, so the vestigial chars from stack shown previously were not completely overwritten.

Eventually, 0xF1 will get extended to 0xFFFFFFF1.

The sum will then become the unsigned integer 0xfffffbc6 (4294966214), which will then be parsed as a signed decimal with sprintf and the format string %KEY%d.

The expected key will then become KEY-1082, as 4294966214 in two’s complement for a 32-bit integer is -1082 in decimal.

Keygen
The following Python snippet creates the key for each input you give as an argument.
|
|
After testing it, we can confirm it succeeds even with border cases!


We can even create the key when when we only input a null-byte (only possible if calling the challenge binary programmatically).

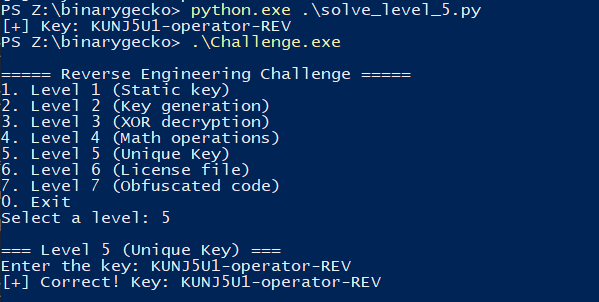
Level 5
First look
Having a first look at the function level_5, we quickly spot that it measures execution time between a for loop of 1.000.000 integer ADD and DIV operations. This is a known anti-debugging technique used to detect if a user is attached to the program with a debugger (as the time to execute inside a measured block could be longer when stopping with breakpoints).
Note that we can still bypass this easily inside a debugger, either by modifying the data used for cmp before branching into the wrong block of code, or by modifying the RIP register after taking that branch to switch execution to our branch.
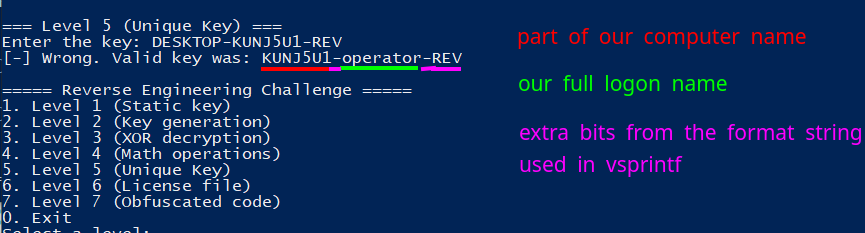
After measuring the time delta of this unused sum variable, it accesses the Computer Name using a known API function from winbase.h, GetComputerNameA. The read computer name is stored in a char buffer with a size of 16 bytes.

This API function is well documented inside Microsoft’s Developer site.
https://learn.microsoft.com/en-us/windows/win32/api/winbase/nf-winbase-getcomputernamea

The next steps in this function are to find the position of the substring “-” inside our computer name, using the well-known C library function strtok.

After checking for the presence of the substring “-” and saving its position internally (to strtok), the program searches for the next substring " " (space) and copies the string that comes before that given space char. In simple words, it copies the substring inside our computer name in between the first dash ("-") and before the space (" ") that comes after that dash.
In our case, the Computer Name is DESKTOP-KUNJ5U1, so the first call to strtok returns the first token DESKTOP. This can be confirmed looking at the RAX register in runtime inside a debugger, just after the first call to strtok.
![]()
After the second strtok call, we would copy the string KUNJ5U1 into the computer name buffer. This can be confirmed again inside a debugger after this call to strtok.
![]()
The next steps are to get the current logged-in username from our Windows machine, using GetUserNameA (also defined in winbase.h) into a buffer.
https://learn.microsoft.com/en-us/windows/win32/api/winbase/nf-winbase-getusernamea

At first, I thought this char array wouldn’t be used to generate the key, as it wasn’t explicitly passed as an argument (using a push to stack) to the vsprintf function. But to my surprise, it actually was used as part of the variable argument list and parsed into the format string.

Note that it’s inserted way down (lower addresses) into the stack, so it becomes akin to a “push” to stack before the call to vsprintf. It’s not so obvious doing static analysis.
Looking at the arguments before the call to sub_140004490 (that eventually calls vsprintf with a similar arg order) in runtime, we can see that the username is included as part of the vaList:
- Consists of the buffer address where the format string and the
vaListvalues will be parsed into. - Consists of the maximum number of bytes to read (256),
- It’s the format string used to parse (
%s-%s-REV) - Value 1 that will be parsed in
vsprintf(parsed computer name) - Value 2 that will be parsed in
vsprintf(logon name)

A key is then generated taking our previously parsed computer name and username into the format string %s-%s-REV using vsprintf. This means the computer name should have a format of any string (with no spaces), followed by a dash, then any string again. If sprintf can’t parse the given format from our parsed computer name, it will just use the full computer name.

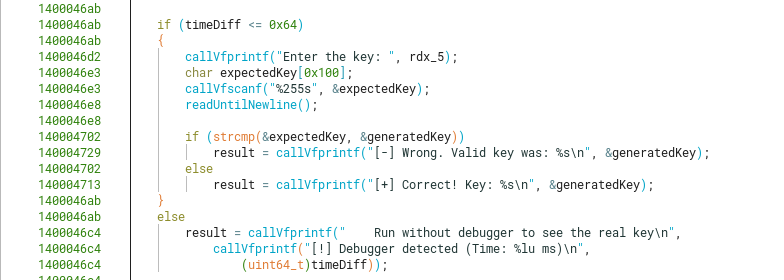
As the last steps, after checking if a debugger wasn’t attached in the measured block using the described technique, the program finally asks the user for the generated key. If it’s not exactly the same, it will still show the expected generated key to stdout.
Key Generation Algorithm
The key is generated following the next logic:
- Get the computer name and currently logged in username inside this machine.
- If the computer name has a “-” substring inside, then rewrite computer name variable to the substring after the first “-” and before the next " " substring. Otherwise just jump into step 3
- Parse the computer name variable and the username into the format
{computername}-{username}-REV.
As we can see, its not exactly “unique” as the challenge says, as it can change if one logins with another user inside the same machine.
Keygen
A simple Python script that dynamically generates the key for this level (if run on the same machine that will run the challenge) is the following:
|
|
Level 6
First look
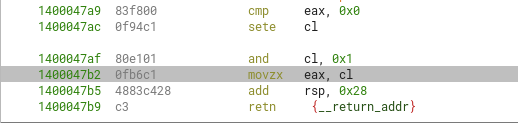
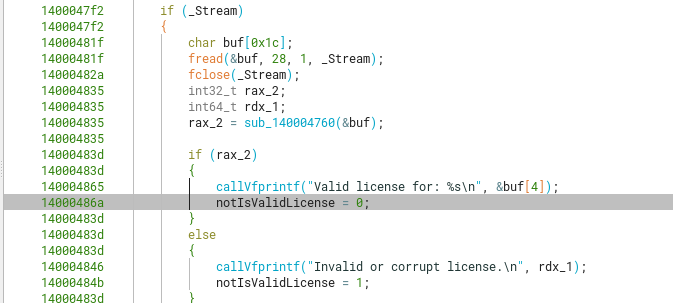
Looking at the function level_6, we see that the program opens the file licencia.enc to read it as a binary file using fopen and fread. After reading 28 bytes from it into a char array, it then validates it with a custom function (sub_140004760) that returns a boolean with the value true if there’s a correct.
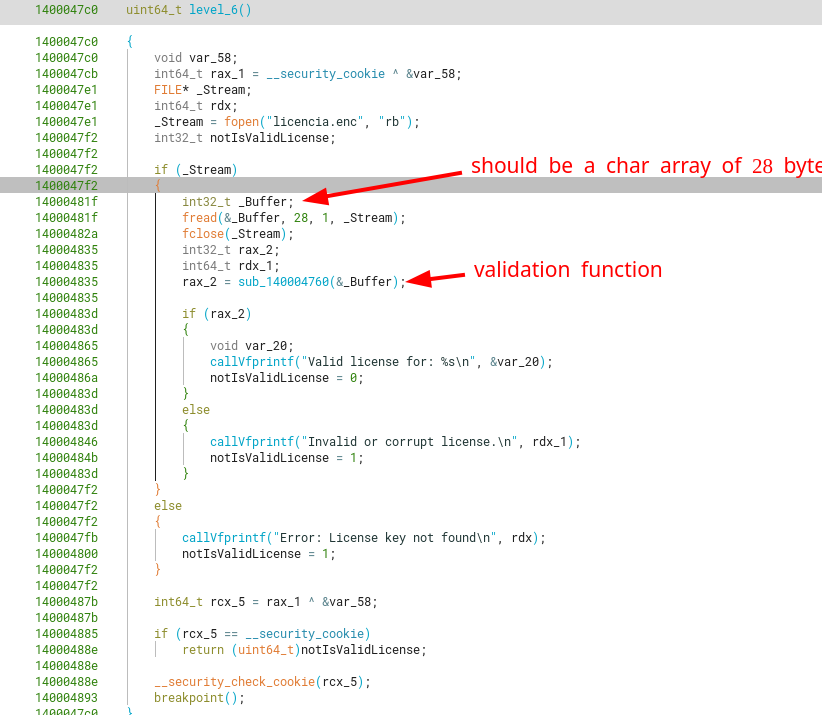
We know of this boolean return type because of this ASM instructions at the end of the function, which only cares for 1 byte (the lower byte of the RCX register) after doing an AND operation with bitmask 0x01.
Coming back to the main level_6 function. First, we can modify the type of _Buffer so it’s properly recognized as a char array of 28 bytes. Now, we can see that whatever the license contains, it will output a string into stdout (parsed with vfprintf) starting from the 4th byte.
License Validation Algorithm
Looking at the license validation function, and re-touching the types for the local variables (like valid) and the return type for the function (bool), we can see the following hard constraints that should be met at the same time in order for this function to return true:
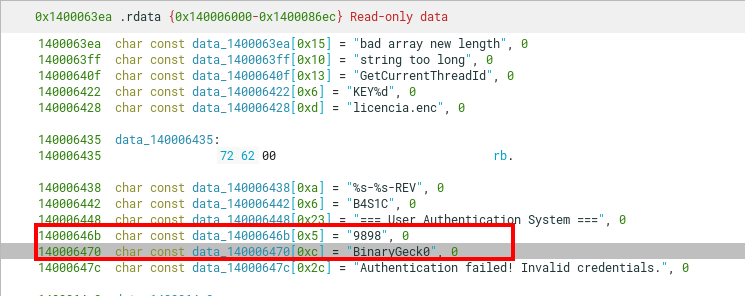
- The first 4 bytes of the file should be equal to the chars
ECIL(0x4c494345in little-endian) - The next bytes (offset 4 to 16) should be equal to the chars
BinaryGeck0\x00(taken from a hardcoded string in the.rdatasection) - The bytes from offset 20 to 25 should be equal to the chars
9898\x00(again, taken from a hardcoded string in the.rdatasection).
Remember that as strcmp is used, the comparison between the 2 hardcoded strings ends only after a nullbyte is found.

This means that the restrictions are non-existent for bytes in offset 16 to 20, and offset 25 to infinity. If we restricted the license file length to just 28 bytes, there would be 256 ** 4 + 256 ** 3 = 72057594037927936 different licenses that this program would accept. But in theory, we could just keep generating arbitrarily large files as long as the previous enumerated constraints are met.
Keygen
A simple script in Python that generates a minimum-sized (25 bytes), valid license file is the next one:
|
|

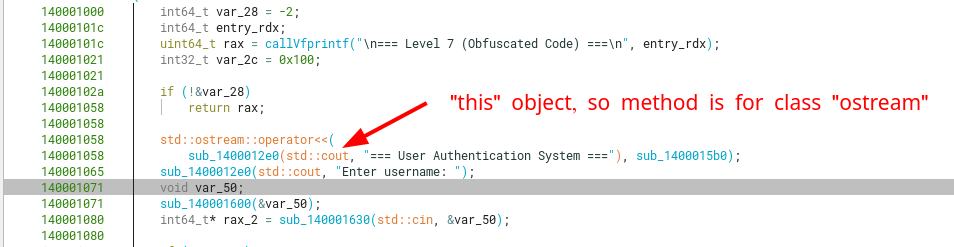
Level 7
First look
Looking at the function level_7 (here not yet renamed), we can see that there’s many calls to unrecognized functions. Some of which are standard C++ methods for classes, and some which are custom. The goal first is to understand which are standard routines, or are very similar to those (for instance if they just call a known method, it can be classified as an indirect call to that method).

Identifying standard code and class methods
Indirect calls and jumps
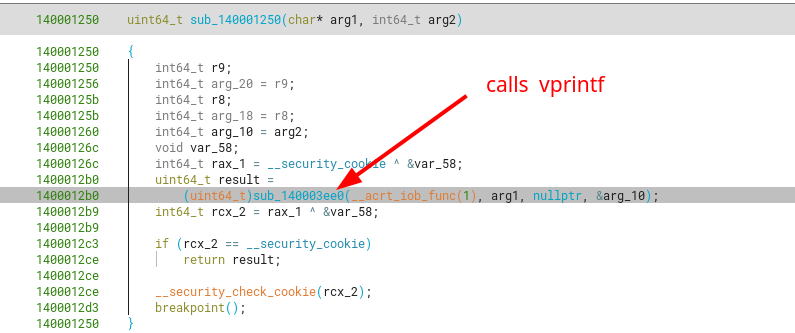
The first function we managed to identify is an indirect call to vfprintf under sub_140001250, which in turns calls sub_140003ee0 which then calls vfprintf.

Other cases are functions that just call a known C function like memmove or memcmp, which we can rename to j_{functionName}.

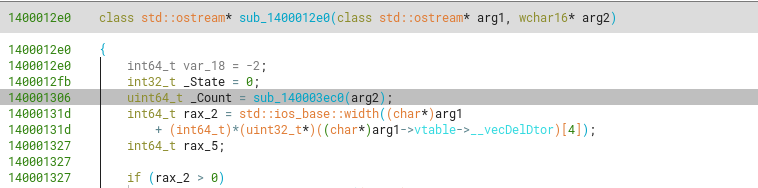
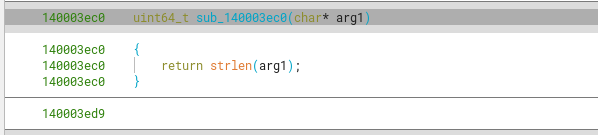
sub_1400012e0
Another function we can recognize partly, the reading of input from stdin (as a char array) to a std::basic_string<char>. We can correctly identify it’s argument types, and that it corresponds to a class method, as we know that class methods contain as its first argument (RCX) a pointer to the this object. However, we won’t attempt to pinpoint the exact name of the method, as long as we know what it does regarding the inputs and outputs (and side effects to them).
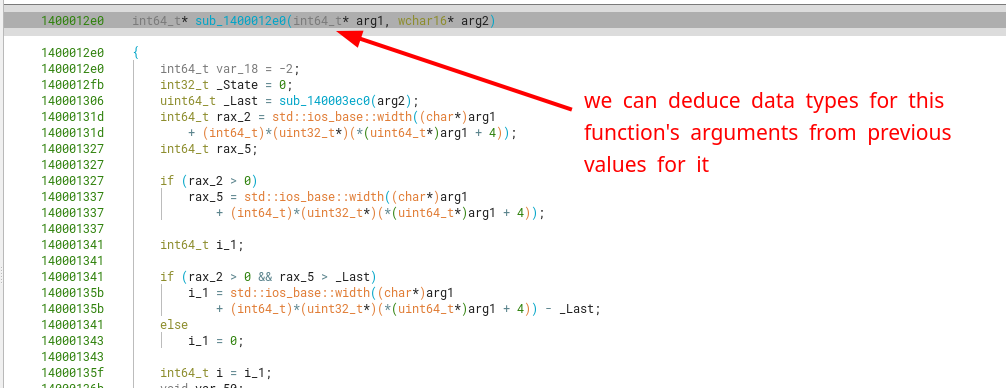
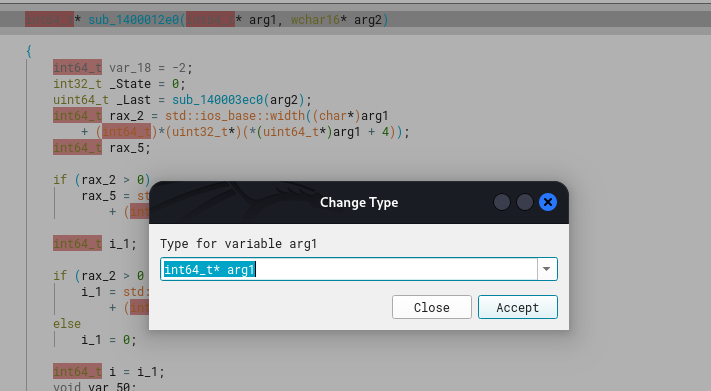
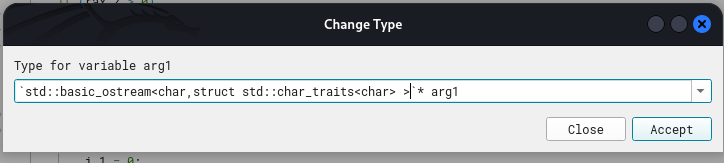
We can create a typedef for the ostream (following the original definition) as shown below.
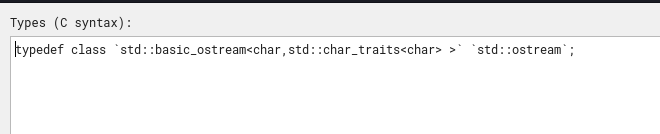
Now it’s more cleanly formatted. Also, we know arg2 is not of wchar16 type but rather a char.
We can confirm this through references to calls using it as such (with strlen) but also actually checking a string that’s called this way.
It’s just one byte per char instead of 2.

![]()
sub_140001630
Following a similar approach with function sub_140001630, we can see its arguments are stdin as a std::basic_istream<char>, and another std::basic_string<char>. This function eventually calls sub_140003aa0, which does the heavy lifting of correctly reading chars from std::cin.


We can keep propagating the argument’s data types (classes) so it becomes clearer when going deep into the callgraph.

While reading more decompiled code inside function sub_140003aa0, we eventually identify the creation of a std::basic_istream::sentry, which is initialized prior to reading input for std::cin.


Finally something that stands out in sub_140003aa0, is the main loop of reading char by char from a streambuf and then inserting them to a std::string (I’ll address later how I dealed with STL strings).

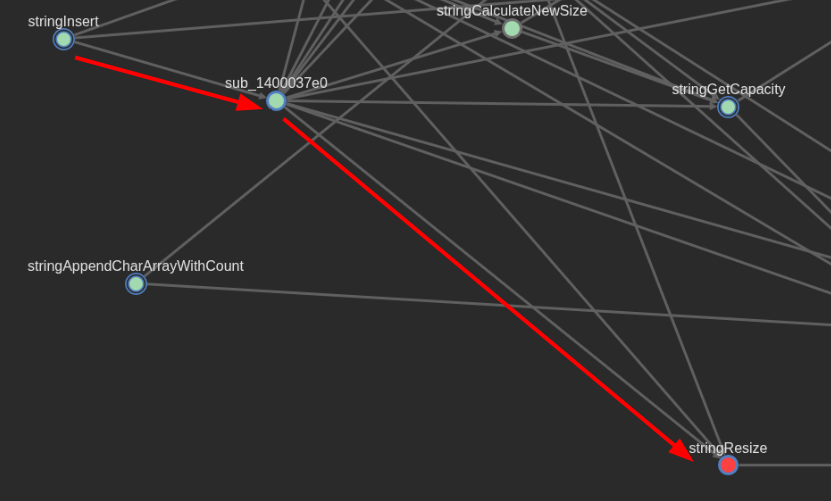
Besides deducing that this is how the program reads from std::cin (stdin), it’s also interesting because the function that I renamed as stringInsertChar has a very deep callgraph, which will eventually call stringInsert (another key function I encountered).

stringInsert will then eventually call stringResize, and as you may guess, it relates to how a string updates its size and capacity members, along with an eventual call to the new operator in order to allocate memory when a string goes over the 16 byte length for its buffer member. I’ll talk more about the std::string definition and its members later.
What is relevant here is that the read from std::cin will impose no limits on its input size (besides the limits imposed by the std::string class, of course). So the username and password could effectively be of any size in this part. More on how the program validates those inputs will be shown later.
Overall, we can rename sub_140001630 to readStdinToString.
Using imports information to our advantage
Another bit of information that we can use for further identifying classes is reading the import table, which serves as a “ground truth” for function signatures (the classes for its arguments and return types).
In this case the std::ostream::operator<< works on a std::basic_ostream<char> object, which is the parent class for std::ostream.
![]()
Extra bit about RTTI
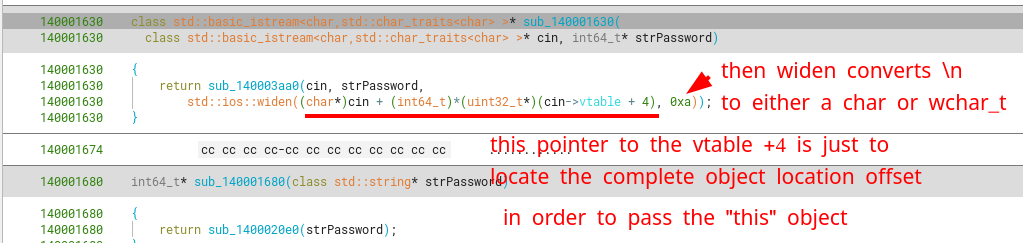
An extra bit of info in case you were wondering why there are functions that reference the start of std::cin, yet add an offset to the vtable member for this class. This happens because what we originally think is a pointer to the start of std::cin (of class std::basic_istream) is in fact just a pointer to part of the object.
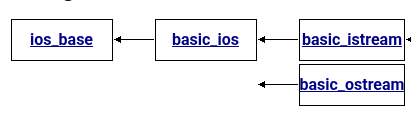
What do I mean with part of the object? Well, this has to do with classes and polymorphism, a key feature in C++. The classistream inherits from the virtual (parent) class basic_istream, which in turns inherits from std::basic_ios, which in turns inherits from std::ios_base.
This means an object from a nested class won’t really have all it’s members data and methods in the same location, but rather it will re-use code from it’s parent classes. This way an object of a commonly instantiated class like std::iostream won’t actually be huge in terms of used bytes for each object in every instantiation.
More of this can be read from this blog post which explains it better and more carefully.
https://www.lukaszlipski.dev/post/rtti-msvc/
Username and Password Class
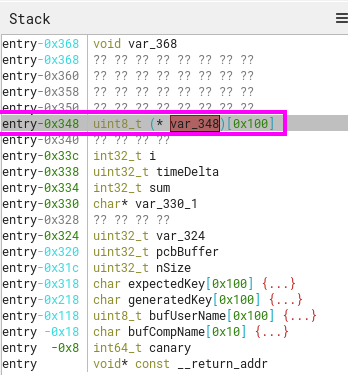
After looking at the stack variables size’s for the username and password (0x20), we can make an educated guess that they’re most likely a std::string (we can discard that it would be a std::wstring from previous function signature analysis).

After creating its data type (or class) from known specifications, we know that this type consist of a total of 32 bytes split across the following members.

I simplified the definition a little here, in order to make it more readable (ignoring the parent classes).
|
|
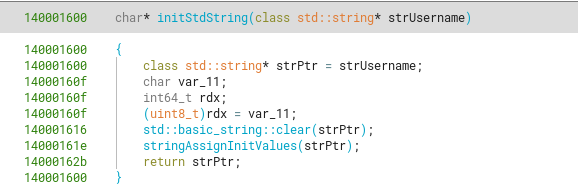
The initialization of this class can be seen when calling sub_140001600.

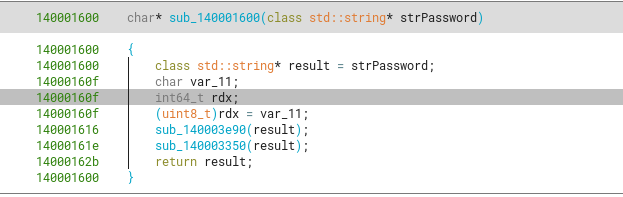
It then calls sub_140003e90 and sub_140003350.

Further going into the first function, we see that it calls sub_1400035b0, which sets all members of this string to null bytes.
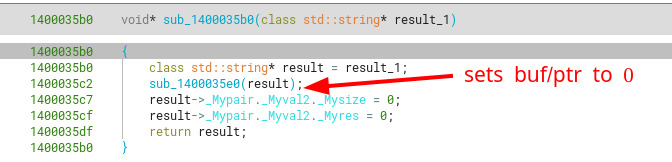

We can rename sub_1400035b0 to std::basic_string::clear.
Going into the next function call, we see that sub_140003350 sets the members for this “cleared” string object to the default string values. That is, having an initial capacity of 15 chars, a size of 0 (because no real chars are written yet), and a buffer with the first char being a null byte (which corresponds to a 0-length string)

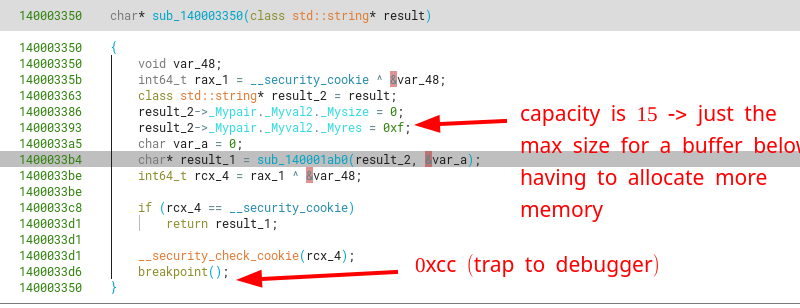

Let’s rename sub_140003350 to stringAssignInitValues.
So basically sub_140001600 “initializes” a std::string object by clearing all it’s values (setting them to 0), and then setting the string members with “default” values. So a good name for this function is initStdString.
I will stop here with analyzing the rest of the classes in detail for this document, as one can see it’s long and sometimes painful, but the same methods shown before can be used to better classify custom and standard code.
Analyzing level_7 calls
Having said all this, we can advance to the interesting part of this level. After parsing our inputs into 2 std::string objects (for the username and password), we have an interesting address at the .data section (where static variables live), data_1400090b8, referencing the same original function for this level (level_7()), added to a constant (0xbb) and then added with the first character from our username buffer.
This new address is then stored into RBX and then used as a function pointer which is then called using our username and password strings as arguments.

Debugging the program with a dummy username and password (both 10 or 0xa bytes in length) shows us the strings are in fact less than 16 bytes in size, and as so, their initial member is completely used as a buffer instead of a pointer to a bigger buffer.

The address in data_1400090b8 can be renamed to jump_ptr to know it contains an address to code.

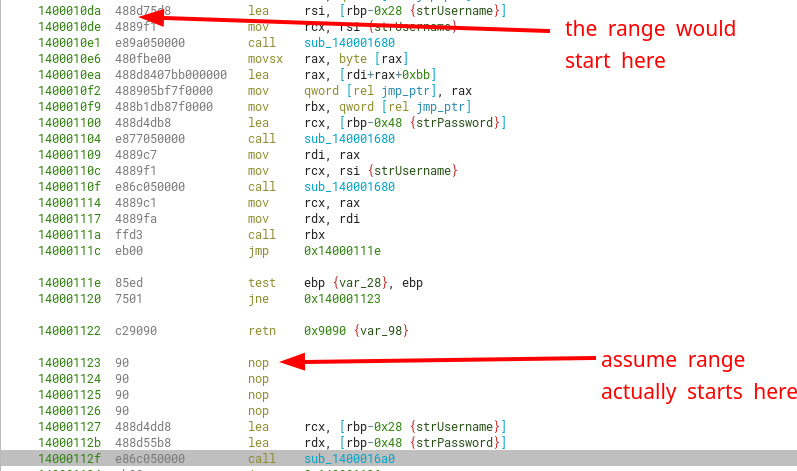
Looking at the disassembly is easier to understand that this jump_ptr will do arithmetic with the first char of our username, and we can confirm it in runtime with a debugger.

The RAX register contains the first char to our username (myUsername).

This makes us think that the ranges that we can jump into, with jump_ptr and our first char, are limited by our username constraints. If we assume the username can be supplied only with printable characters (bytes between 0x20-0x7e), then the addresses to jump into goes between 0x1400010db-0x140001139. However, if we further assume that we shouldn’t jump to previously executed instructions (because it will be meaningless or cause a crash), then we can actually start from 0x140001123 (nop instruction), which comes.
Assuming we want to eventually call sub_1400016a0, which makes a validation with the username and password and tells us whether we got the right creds (through a bool), then our address range is further constrained from 0x140001123-0x140001127.

We can also include as whitelisted address 0x14000111c, 0x14000111e, 0x140001120, 0x14000112b and 0x14000112f. These are the starts of valid instructions that won’t make the program crash before reaching the credential validation function.
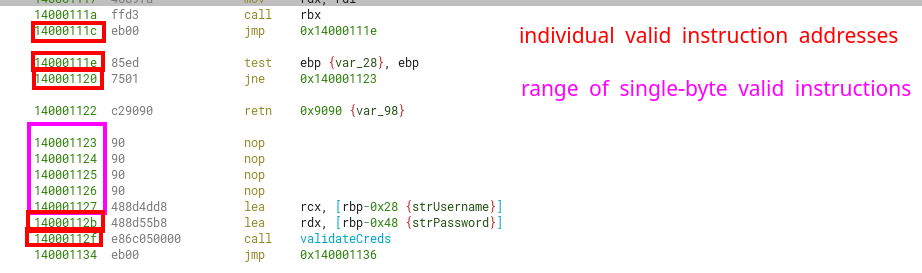
This further makes our first character choice be one of the next options:
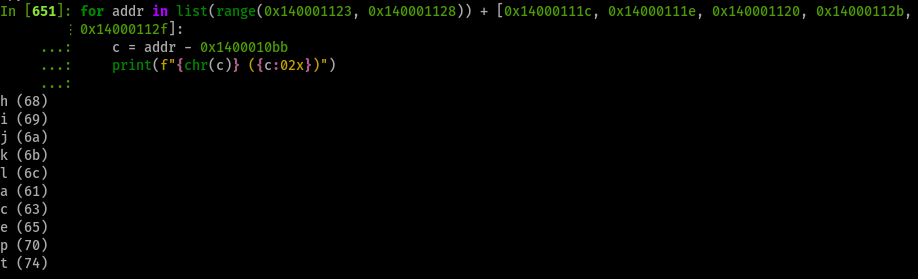
Other characters will make the program jump into a certain crash either by overwriting RCX and RDX to garbage (so strUsername and strPassword won’t be used for validation), or make the processor hit a SEGFAULT or undefined instruction exception.
Username and Password Validation
Reaching the main function that performs the validation with our inputs, we first noticed that there are two calls to GetModuleHandleA, which returns the point to the specified function inside a library (in this case kernel32.dll and vcruntime140.dll). However, these addresses are used for calculating an offset inside a XOR operation (so it will just return a constant offset between those functions).


This happens because these 2 DLLs are allocated in the process memory in the same order, and with a constant offset each time this program is started.
The obtained value is 0x000000000000018F, using sumBytes as 0x21EC7E65F7 (don’t worry, I’ll address this later).
![]()
sub_140002120
There’s also a function that uses the address of the level_7() function, that sums all its bytes until finding the first ret instruction (or traversing the first 0x1000 bytes). As this function won’t ever change (unless you modify an instruction in runtime), its return value will be always the same.

Looking at the returned value in runtime with a debugger, we can see sum is 0x00000021EC7E65F7.

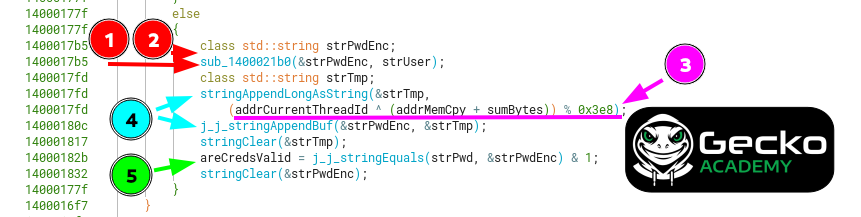
sub_1400021b0 part 1
Looking at the first call that transforms the username inside the validateCreds function, we see that it gets encoded char by char with XOR andADD operations.


Afterward, an interesting calculation is made with the length of the username. This is shown in the decompiled view as a simple operation, however it’s more complex looking at the individual x86 instructions, although the results using both expressions are the same.

The following values are what we would get from it depending on the username size (we checked until reaching length 16), however it’s cyclical.

I will leave the analysis for this function here, as reversing this function is more dependent on the next ones. We will return to analyze this function later.
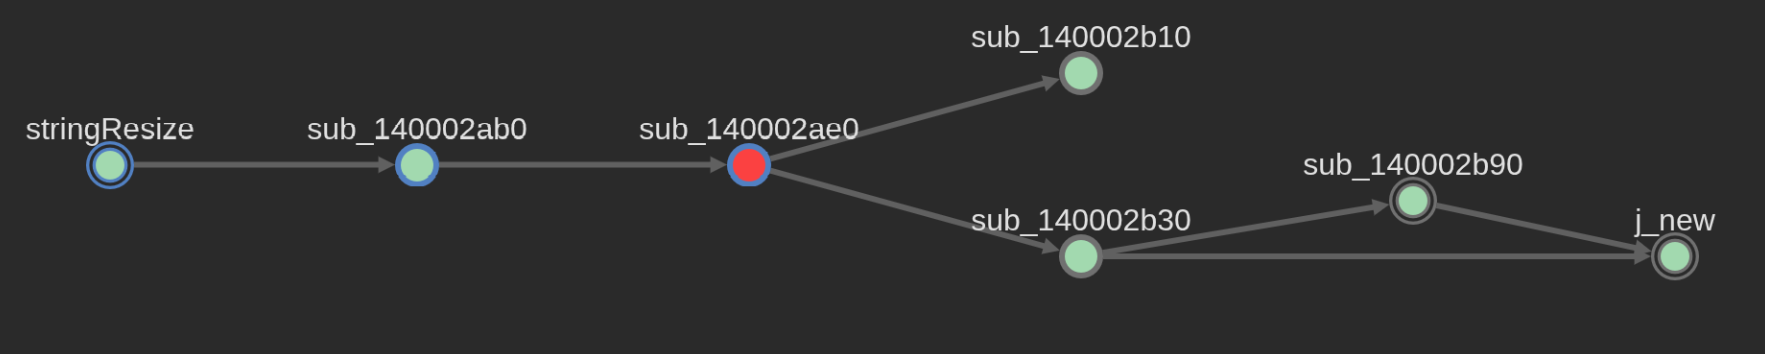
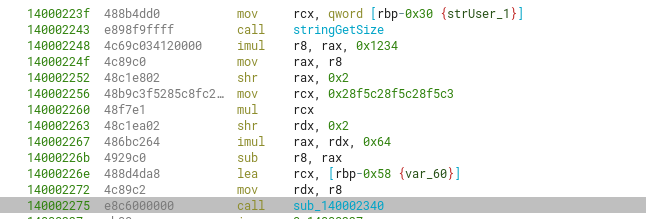
sub_140002340
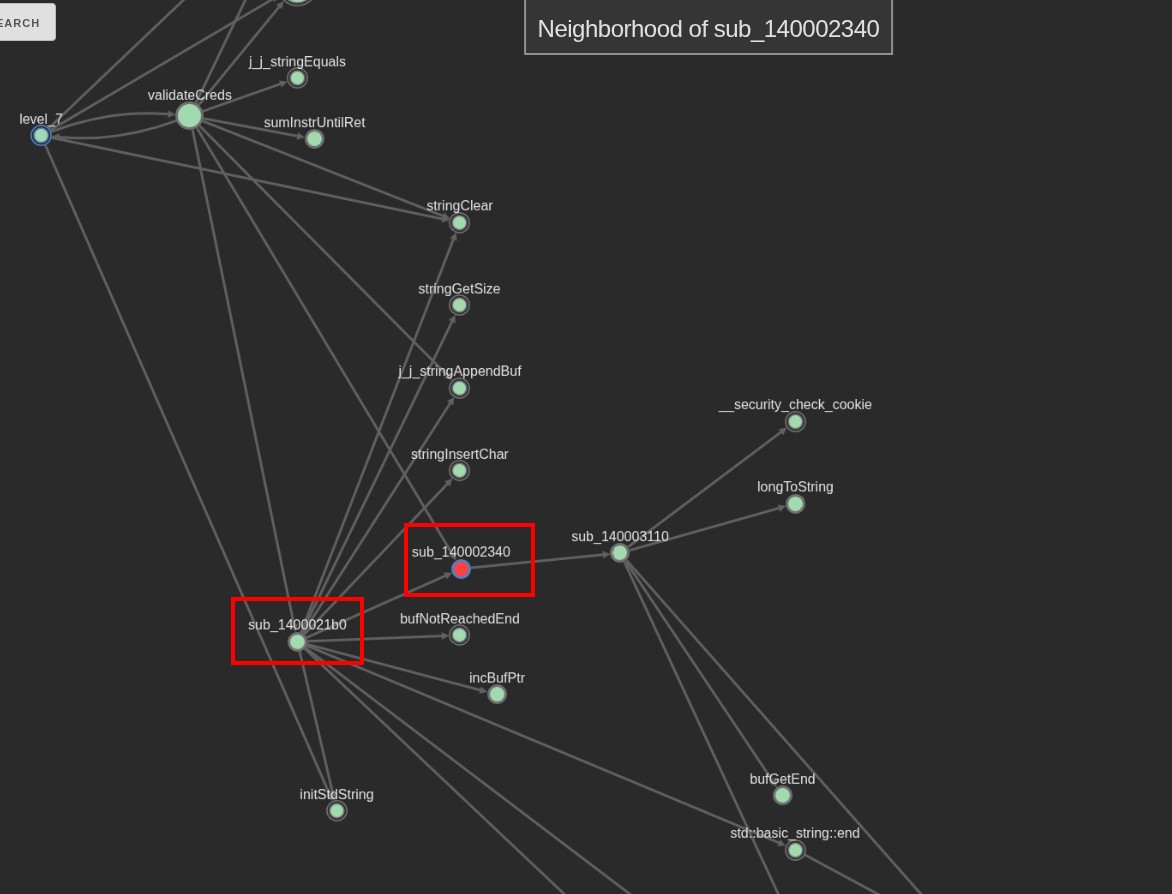
Looking at the second relevant call inside the validateCreds function (sub_140002340), which does a calculation with 2 DLL offsets and the sum of bytes for level_7, we can see that it’s a previously called function inside sub_1400021b0. That is, part of its code is also used inside sub_1400021b0.


This can be clearly seen through the callgraph.
From previous results, we know that the constant (sizeMult) that is passed as the second argument to this function is the long integer0x18f (399 in decimal)
![]()
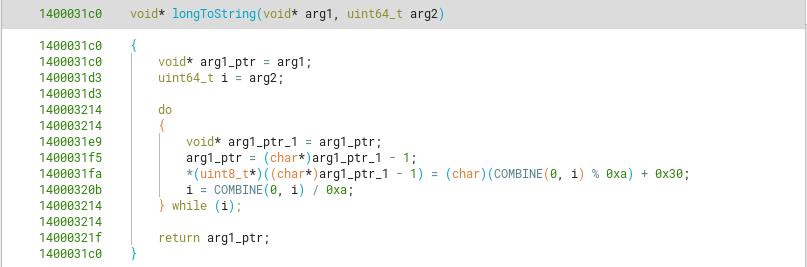
Going deeper into the callgraph, the sub_140003110 function shows us it’s appending (or assigning) the values from a string version representation of arg2 (sizeMult) into this new string (arg1).
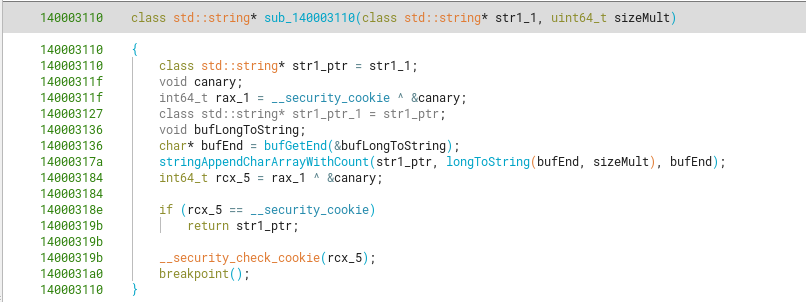
The longToString function goes from the end of a char array assigning the corresponding char values representing the original long integer. In this case, the 0x18f = 399 would append the simple string or char array “399” into the original string. As the string is already empty, this is basically an assignation instead of “appending”
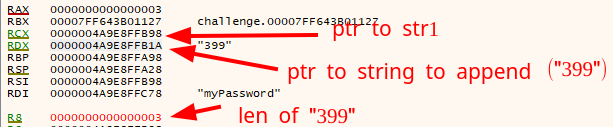
Through debugging just before the call to our defined function stringAppendCharArrayWithCount, we know its argument values are in order the next ones.
We can rename sub_140002340 to stringAppendLongAsString instead, as it summarizes its functionality.
Going back to the validateCreds function, the next step is appending the longToString to our previously encoded username.
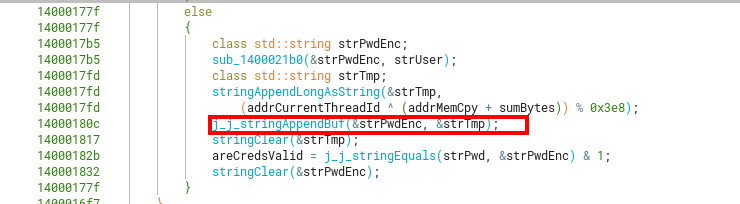
This function makes 2 calls to a function we recognized as a sort of “stringAppend” function, which resizes the internal buffer used to store the chars of the string if necessary, using new to allocate for more memory and storing the pointer instead of having an internal buffer on the string object itself.

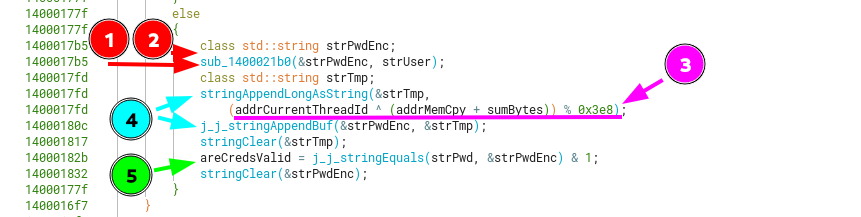
Other steps in validateCreds involve erasing or clearing the previously initialized strings, however a much more interesting part is the comparison between the original password we input, with the now encoded username + long.
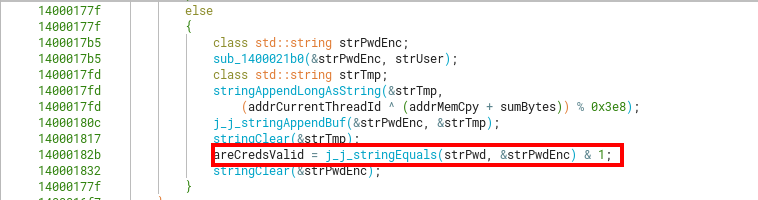
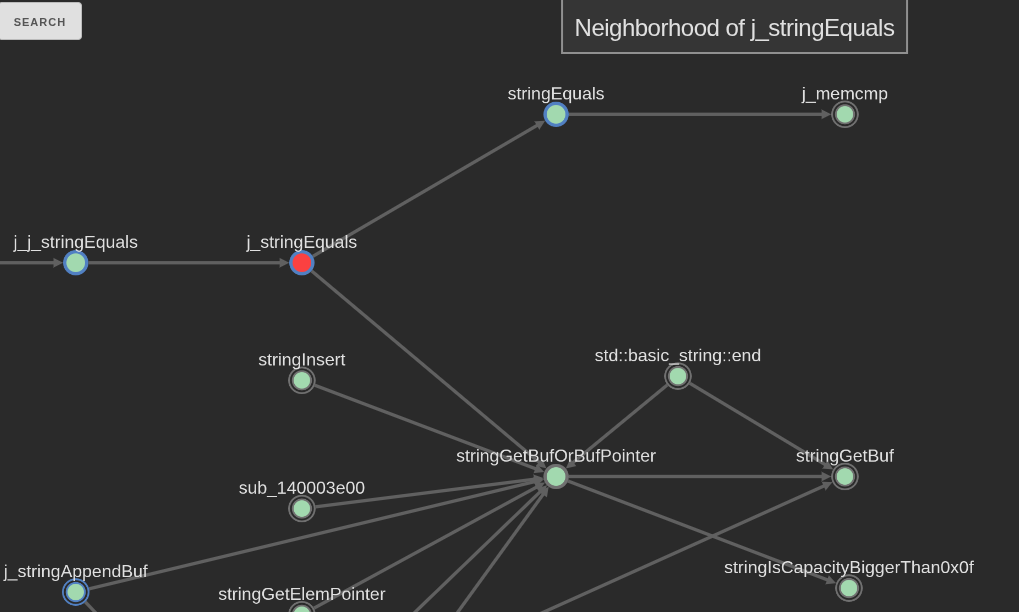
We called this function j_j_stringEquals because it does 2 calls before eventually reaching the stringEquals, which performs a memcmp on the 2 buffers of the strings passed as arguments. If said strings aren’t even the same size, it will fail prior to comparation.
Debugging the arguments used just before calling j_j_stringEquals with the previous inputs confirms our findings.


sub_1400021b0 part 2
Knowing how previous functions behave, we can now summarize this function as a sort of encoder for the username + appending a constant as a string to it’s end.

Credential Validation Algorithm in a Nutshell
Doing a recap on the validateCreds function:
- Performs an transformation on the username using XOR and ADD operations on each char.
- Appends a dynamically generated number to the previously transformed username, that’s then converted into a string. This number is dependent on the length of the username.
- Calculate a number with the 2 DLLs function addresses and the sum of all bytes in
level_7until finding aretinstruction. This is constant in each run. - This constant is then converted into a string version of its decimal representation, and appended to the end of the previous string.
- Compares the transformed string from step 4 with the original, non-transformed password.
Crafting Valid Credentials (or are they?)
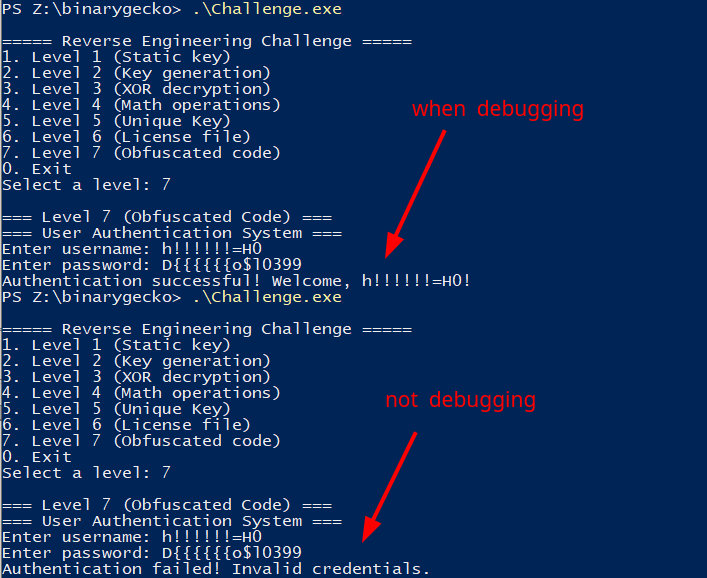
Armed with this knowledge, we can now create a username with it’s matching password… But wait. Something weird’s happening. One of our many generated credential pair is only passing validation when we actively debug the program.
What could this be?
Fixing the Keygen for Valid Credentials
Something I missed when originally retrieving the sumBytes constant after calculation inside a debugger, is that software breakpoints were being taken into account for the sum of bytes. As I planted some breakpoints between the start of level_7 and its first 0x1000 bytes, I got an incorrect value that got dragged into the calculations for the final encoded username, as software breakpoints are created inserting the instruction int3 (byte c3) into code. This can be fixed removing breakpoints in the areas of interest (from level_7 to its first 0x1000 bytes or until finding a ret), or just using plain ol’ hardware breakpoints, which are handled through registers and the CPU instead of inserting instructions at runtime.
The actual value for sumBytes is 0x00000021EC7E654B. So now the constant that’s converted to a string and appended to the encoded username at the end is 0xc3 or 195 in decimal representation.

Keygen
The resulting code I used for generating an arbitrary long username is the following. It finds close solutions (only a few chars change between them) using backtracking.
|
|
Now we can generate as many arbitrarily long usernames we want with their corresponding passwords!
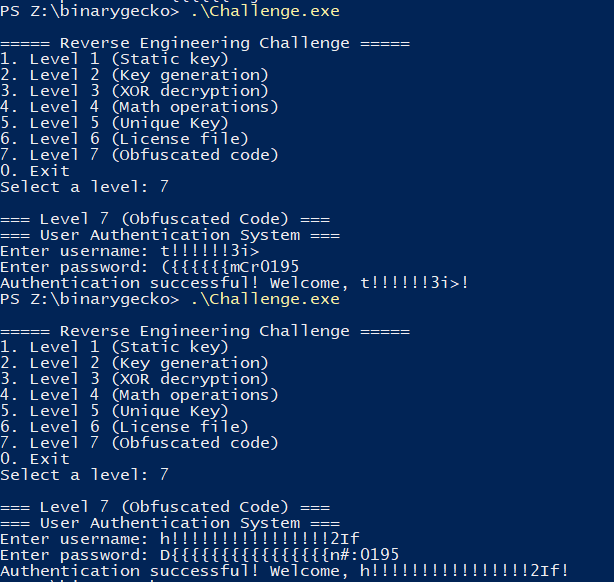
![]()
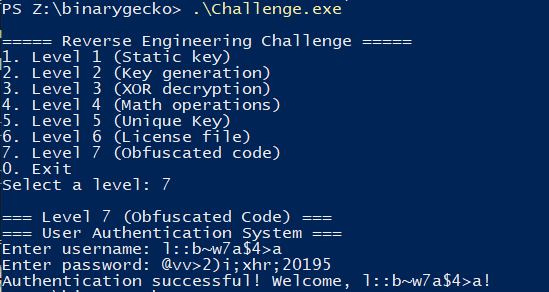
Here I made it generate one valid pair of credentials with username length 12
![]()
In this other image, I made it generate 5 pairs of credentials with username length of 20

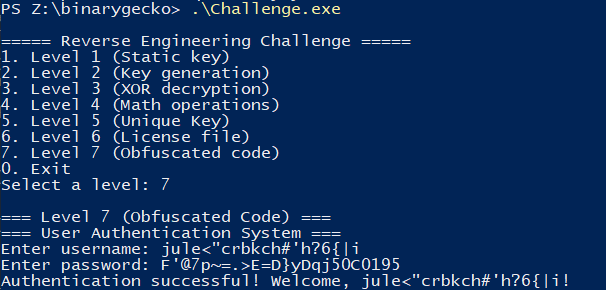
The next picture shows me using a username of length 12, then a username with length 20.